Wednesday, June 27, 2012

I Had a White Door and I Wanted it Painted Yellow...

And so I did.


There's a whole lot of sunshine and happiness going on in our house, but until last week you wouldn't know it by looking at the outside. The boring white door and faded pillars and trim just didn't fit.

One of this year's outdoor projects was to repaint the trim and pillars on the house as they had become incredibly faded and dull. During my search for the perfect matching exterior paint colour I kept looking at the house and thinking I wish there was a way to brighten it up. And so, a colourful door it is!

After sorting through the dusty Colour Theory files in my brain I eventually came to the decision of painting my door yellow to complement the "Smokey Blue" pillars. So here it is the "Empire Yellow" door.


And a super big thank you to my loveliest of lovely neighbours, Lisa, for gifting me with this stellar blue and yellow leafy doormat!


Let the sunshine and happiness continue!


Monday, June 25, 2012

Make It Monday: Clothespin Photo Wreath


If you took a look at my Laundry Room Facelift post this Make It Monday project will not be a surprise.

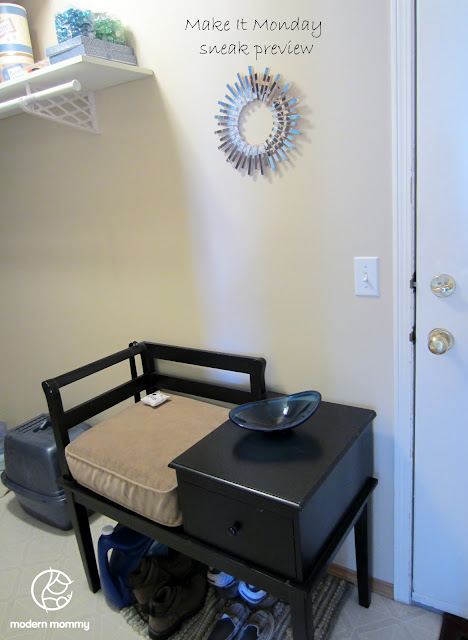
In the process of jazzing up my laundry room I thought it would be nice to have some sort of simple artwork on the wall. What could be more fitting than a clothespin wreath?

What you’ll need:

Stiff cardboard
Scissors
Hot glue
Felt
Clothespins
Photos, fabric or pretty paper
Ruler
Rotary cutter
Cutting mat
Photo safe glue
Small paintbrush
Picture hook and nail


Directions:

Step 1. Trace and cut out a large circle on the cardboard (size will depend on how large you want your finished wreath). Trace a slightly smaller circle about 1 – 1.5” inward on the large circle. Carefully cut out the inner circle. You will be left with a cardboard ring.

Step 2. Glue a piece of felt to the front of the cardboard ring, trim the edges around the ring leaving enough excess to fold over and glue to the back of the ring. Carefully cut the centre of the felt through the ring, trim, fold over and glue to the back of the ring.

Step 3. Arrange the clothespins on the ring alternating heights to add dimension. It's important to do this step first if you're using photos that need to be aligned.

Step 4. Measure the width of the clothespins and cut your photo in narrow strips to fit. Do not trim the strips to the height of the clothespin yet.


Step 5. Spread a thin layer of glue on one of the clothespins that is positioned furthest from the centre of the ring. Align the top of the first photo strip with the top of the clothespin and press it firmly down. There will be excess photo strip at the bottom of the clothespin. Spread a thin layer of glue on the next clothespin, which is positioned closer to the centre of the ring than the first. Align the top of the next photo strip next to the top of the first one and secure it in place on the clothespin. The second clothespin will then have excess photo strip at its top. Continue gluing and placing the photo strips in sequence ensuring the picture lines up.

Step 6. Once you've completed step 5 remove one of the clothespins, place it photo side down on your cutting mat and trim the top and bottom excess using a rotary cutter. Replace the clothespin on the felt ring and repeat with the next clothespin. Continue this process until finished.

Note: I used two photos to complete this project. I aligned the top of the second photo with the end of the clothespins closest to the centre of the ring. See image below.


Step 7. Decide what point you want to be the top of the wreath and hot glue the centre clothespin to the ring. Mount a simple picture hook on the wall; hook it underneath the secured clothespin to hang it.


Happy Monday!


Thursday, June 21, 2012

Laundry Room Facelift


Laundry Room on its own isn’t really an accurate description of what this space is, which is why it was so out of hand in the first place. This teeny little space is, in fact, our Laundry Room, Mud Room, Cat Cave, Garage Go Between, Cleaning Supply Storage and now Craft Storage room. That is a great deal of responsibility in and of itself, but add to the mix that this little room is also shared with the tenants that we have living in our basement suite. Yikes.

I did my best to ignore this room as much as possible, but the truth is with two kids in the house we I do a lot of laundry and this room was not sending out the right vibes for cleanliness. Facelift time!


Here's what I did:

Gutted, cleaned and painted.

Converted an old sofa cushion into a smaller bench cushion for our cat Oliver.

Organized and stored all of the painting supplies in the closet, which made room for my smart looking Formula Can Craft Supply Containers.


Sewed a curtain to hide all of the laundry paraphernalia. I kept it simple by using grommets and hanging it on a shower curtain tension rod.


And added a couple of little decor items to make me smile. You'll see how I made this clothespin wreath if you read my next Make It Monday post.


Off to do some laundry!

Nope, still not excited about it, but at least it's clean and organized in there.


Monday, June 18, 2012

Make It Monday: Dessert Stencils


My favourite brownie recipe happens to be the delicious fudgey kind that does not need icing to hide the boringness that characterizes other cakey brownies. You can find the Best Brownies recipes on Allrecipes.com. The recipe there does have an accompanying icing recipe, but I prefer a dusting of icing sugar instead.

I recently made brownies for a last minute poker night. I know what your thinking "Who makes brownies for poker night?" Well, normally I wouldn't, but we had a pre-poker BBQ which included a few friends and Sophie's favourite little girlfriend Ava. Definitely a suitable brownie occasion.

So here are the brownies...


Boring right?

I had a few spare minutes so instead of my usual icing sugar dusting over the whole batch I figured I'd try my hand at making a custom stencil.

What you'll need:

Thin cardboard - a cereal box or file folder will do
A printed or sketched design
Tape
Exacto knife
Mini sieve
Icing sugar or cocoa powder
Prepared brownies, cake or other dessert


Directions: (Photo directions follow)

Step 1. Tape your printed or sketched design to the thin cardboard. I just did a google image search for "card suits" to acquire this one.

Step 2. On a suitable cutting surface (ie. cutting board) carefully cut out the design with an exacto knife. You may have to go over it twice to get through the layers.

Step 3. Remove the tape and printer paper. Lay the cardboard flat on your brownies or cake. Place a small amount of icing sugar in a sieve and tap it gently over the entire stencil.

Step 4. Carefully remove the cardboard stencil by lifting straight up. Voila! You're masterpiece is revealed.


Yum-O! Happy Monday!


Monday, June 11, 2012

Make It Monday: TP Roll Owls


This one's for the kids! 

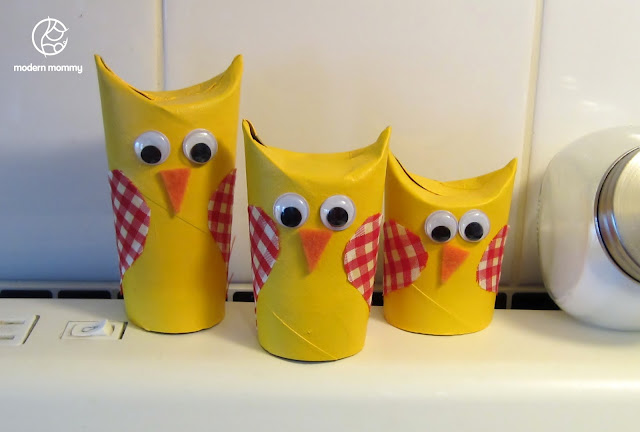
Okay, in all honesty it started out as one for the kids, but then it turned into a craft for me too. I started by making one of these little guys with Sophie and then decided that he needed some company. So now I have three little owls keeping me company in the kitchen. Cute, right? No? Well, it'll be fun for the kids anyways.

I first saw these when I was perusing Pinterest the other day. Thanks to Natural Kids for the brilliant idea.

What you'll need:

Cardboard toilet paper or paper towel rolls
Paint
Paintbrush
Paint tray - I use plastic container lids
Googly eyes
Fabric scraps - cut into teardrop shapes
Felt - cut into triangles
Glue

Directions:

Paint the cardboard roll. Prepare to get messy like us. Let them dry completely.


Note: You may be wondering about the fairy wings, backwards fluffy headband and goofy crooked glasses. Well, if you read my earlier post The Toddler Diaries: Fashionista it makes complete sense. This is just any other day in our house.


Fold the top of each cardboard tube to form the owls ear tufts. Begin by setting the roll up on one end and folding the top end toward the centre of the tube. Repeat with the opposite side. See the image below.


Embellish with googly eyes, fabric wings and felt beaks. Affix with whatever type of glue you like. I prefer glue that dries clear since we tend to be a bit on the messy side here (this is why there is only one photo of Sophie during the gluing stage).


Voila! Happy little owls.


Happy Monday!


Wednesday, June 06, 2012

Camp Recipe: S'more Cones


Camping is not camping without s'mores right? Graham crackers, chocolate and marshmallows, oh my!

Although the old fashioned way of making s'mores is great, I opted to try my hand at something new after coming across Quirky Momma's Campfire Cones. Chocolate, marshmallows and fruit all melted together in a waffle cone sounded so tempting. I was a bit intimidated by the waffle cones though, they are so huge and my general lack of self restraint when it comes to sweets would surely lead to my demise. So I went with a sugar cone.

Ingredients:

Sugar Cones
Mini marshmallows
Chocolate chips
Strawberries, chopped


Directions:

1. Mix the marshmallows, chocolate chips and berries together.

2. Wrap a sugar cone in foil leaving the top open.

3. Load the cone with the sweet mixture, right to the top.


4. Fold the foil over the top. Note: If you'll be putting these on the campfire you may want to put a second layer of foil over the cone.

5. Heat over the campfire or on the BBQ. Watch them very closely they don't take long, just a couple of minutes depending on how much heat there is.


6. Unwrap and enjoy!


Toddler approved.


Monday, June 04, 2012

Make It Monday: Sandwich Cake


My brother recently celebrated his 30th birthday so I decided to make him a fun birthday cake. Since he loves sandwiches I went with a sandwich cake.

Although it would have been nice to have the filling look like lettuce, tomatoes, cheese, etc. I've always been a big believer that it must taste great first and foremost. So in the absence of creative, funky filling ideas I opted to make the "bread" a little bit on the fancy side.

This cake recipe is adapted from the White Almond Wedding Cake on Allrecipes.com. It's a great sturdy cake that works well for shaped cakes such as this one. And it's delicious!

Marbled Rye Sandwich Cake with Almond Buttercream and Strawberry Filling


Ingredients


Cake:
1 package white cake mix
1 cup all-purpose flour
1 cup white sugar
3/4 teaspoon salt
1 1/3 cups water
1 cup sour cream
2 tbsp canola oil
1 teaspoon vanilla extract
4 egg whites
1/4 cup cocoa powder
1 teaspoon almond extract

Strawberry Filling:
1 cup fresh strawberries, hulled and coarsely chopped
1/4 cup sugar
1 tbsp cornstarch

Almond Buttercream:
1/2 cup butter, softened
1/2 tsp almond extract
1 1/2 cups confectioners' sugar
2 tsp milk

Olive Cakepop:
1/4 cup cake trimmings, crumbled
1 tsp prepared Almond Buttercream icing
1 square of white bakers chocolate
A few drops of green food colouring
1 small skewer stick
1 or 2 red M&M's

Directions

Prepare the Cake

1. Preheat oven to 325 degrees F. Grease and flour two 9 x 9 square cake pans.

2. Stir together the white cake mix, flour, sugar, and salt in a large bowl until well mixed. Add the water, sour cream, oil, vanilla extract and egg whites. Beat with an electric mixer on low until all ingredients are mixed and moistened.

3. Spoon 1/3 of the cake batter into a separate bowl. Add the cocoa powder and mix thoroughly. This is your chocolate batter.

4. Add the almond extract to the remaining 2/3 of the cake batter and mix thoroughly. This is your white batter.

5. Divide the white batter evenly between the two prepared cake pans and shake the pans gently to allow the batter to spread to all edges. Carefully spoon the chocolate batter on top of the white batter to form a spiral. Do not stir or cut through the batter.


6. Bake in the preheated oven until the top of the white cake is a light golden brown and a toothpick inserted into the center of the cake comes out clean, 25 - 35 minutes. Cool completely and set aside.


Prepare the Strawberry Filling

1. Combine the strawberries, sugar and cornstarch in a small heavy saucepan. Bring to a boil over medium heat, stirring constantly and crushing the berries slightly with the back of a spoon.

2. Boil for 2 minutes to thicken, stirring constantly.

3. Poor into a bowl and allow to cool completely.


Prepare the Almond Buttercream

1. In a medium bowl, cream together butter and almond extract. Add confectioners' sugar and beat well. Add the milk and mix until light and fluffy.


Shape the Cake

1. Once the cake has cooled completely, cut a square of parchment or wax paper the size of the cake. Fold the paper in half and draw the outline of one side of a sandwich slice (see image below), cut along the line through both layers of paper, unfold and lay on top of one of the square cakes. Note: To ensure the paper doesn't stick to the top of cake you can spray it with a thin coating of oil. 


2. Using a sharp knife trim around the paper to create a sandwich slice shape. Do the same for the second cake.


Make the Olive Cakepop

1. Mix 1/4 cup of crumbled cake trimmings with 1 tsp of the Almond Buttercream icing. Form into an oval with your hands. Refrigerate or freeze until firm.
2. Melt 1 square of white bakers chocolate in the microwave. Add a few drops of green food colouring and mix well.
3. Using a small skewer stick pierce the bottom of the cake oval and dip it into the "green" chocolate so it is completely coated. Stand upright in a an empty egg carton or some other prop. Press M&M's into one or both ends of the "olive" before the white chocolate hardens. Refrigerate until firm.


Assemble the Cake

1. Lay the bottom layer of cake upside down onto your cake plate or cake storage container. Spread a layer of the prepared Almond Buttercream on the surface of the cake right to the edges. Top with the prepared Strawberry Filling and spread to the edges.
2. Lay the top layer of cake upside down on a piece of parchment or wax paper sprayed with oil to prevent sticking. Spread a layer of the prepared Almond Buttercream on the surface of the cake right to the edges.


3. Carefully lay the top layer of cake onto the bottom layer, forming your sandwich.


 Decorate, serve and enjoy!


Add the Olive Cakepop to the centre of the cake. I opted to make a cardboard sign rather than writing in icing on the cake.


Happy Monday!