Monday, April 30, 2012

Make It Monday: Plant Markers


This project wasn't really on my to do list, but last Wednesday, when I dropped Sophie off at the day home she goes to one morning a week, I realized that this was Sophie’s last day there. I had planned on buying a sweet gift for the day home owner’s baby on the way, but my sick little baby had kept me trapped at home for fear of dealing with unspeakable accidents in public.

So, working with what I had on hand, I opted to give her a Sweet Cherry Hybrid Tomato plant. I started several plants from seed in early spring and ended up with more than I needed for our little family. Of course it needed a couple of personal touches for it to truly be a special thank you gift. A little ribbon and handmade plant marker were just what this occasion called for. Here's how I made the plant marker...


What you'll need:

Oven-Bake Clay
Rolling pin
Knife
Rubber stamps
Baking dish or pan


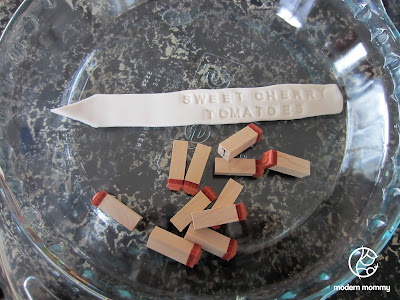
I used translucent Sculpey III Oven-Bake Clay. The translucent clay lets light through the thinner areas of the clay project, in this case the stamped lettering.


Directions:

Make a ball. Start by rolling a small amount of clay into a ball, about a 1 1/2" round ball should be enough to make this size of plant marker.


Shape the marker. Roll the ball into a clay snake to the desired length of your marker. Gently flatten the snake with your rolling pin so your marker is about 1/4" thick. Trim one end of the marker into a point with a smooth knife.


Stamp. Lay your marker in a baking dish or pan. Stamp the letters into the clay. I find it easier to start at the end and spell the words backwards so they go right to the end of the marker.


Bake. Bake the clay marker according to the package directions. The recommendation for this particular clay was to bake at 275 degrees Fahrenheit for 15 mins per 1/4" of thickness. If you baked it according to the directions and it still seems a bit floppy it should harden further as it cools.


The light will show through the stamped lettering if you used translucent clay and rolled it thin enough. You can use opaque and coloured clay for this project as well, but the light won't show through.


 Happy Monday!


Monday, April 23, 2012

Make it Monday: Sun Catchers


This one's for the kids!


This is a messy and fun craft for toddlers.

What you’ll need:

Construction Paper
Saran Wrap
Finger paints
Glue – I used Mod Podge
Tape
Fishing line
Suction cups


Directions:

Fold and cut the frame. Fold the construction paper in half and cut out your desired shape. Fold it in half again to cut out the opening in the middle. You should end up with two identical windows joined in the middle by a fold.


Assemble the open frame. Tape the frame to your work surface. Spread a thin layer of glue on the lower half of the frame and lay a sheet of saran wrap over top. Try to keep it taut so there are no wrinkles. Tape the saran wrap to the work surface so it doesn’t move around.


Paint. The station is set up; let your little one go wild with finger paints.


Finish the frame. Lay a second sheet of saran overtop of the paint. Spread a thin layer of glue on the top half of the frame and fold over top enclosing the saran wrap. Let the glue dry and trim the excess saran wrap.


Display. Hang the sun catchers in a bright window using suction cups and fishing line. 


 Happy Monday!


Friday, April 20, 2012

Home DIY: Reupholstered Dining Chairs


Our dining table chairs have been starting to look a little worse for wear these days. Not surprising since the cushions are a beige suede fabric and we have a grubby-handed toddler. Sure, with enough scrubbing they come fairly clean, but they always seem to look dirty so my solution was to give them a kid-proof makeover.

What makes it kid-proof? Outdoor fabric of course!


Yes, I reupholstered the chair cushions with outdoor fabric, which is durable, easily wipes clean, and still has a homey feel to it. If you're interested in taking on this task, here's how it's done...


What you'll need:


Screwdriver - size and style differs depending on your chairs
Flathead screwdriver
Pliers
Fabric - I used a solid black outdoor fabric
Staple gun
Staples
Scissors


Directions:


Remove the seat cushion. Unscrew the seat cushion from the chair frame. Mine was held in with 3 screws. Make sure you keep your screws in a safe place you'll need them to reattach the seat.


Remove the underside fabric. This is usually a thin piece of fabric or heavy paper used to cover the edges of the upholstery fabric. Pry the staples up with a Flathead screwdriver and pull them out with pliers. 


Remove old upholstery (optional). I omitted this step because my old fabric was not overly heavy or dingy, plus it would have taken me an entire week to remove all of the staples on all 8 chairs. You'll want to remove the old upholstery if it's textured or dirty. If you choose not to remove it as I did then make sure you clean the existing fabric really well.


Measure and cut the fabric. Cut your fabric to fit the seat cushion with enough overlap on all sides to wrap and staple to the underside.

Wrap and staple. Pictured below.
Center your seat cushion on the fabric, fold one side over and secure in the center with one staple.
Pull the fabric snug (but not so tight that it distorts the cushion) and secure on the opposite side with a staple.
Take a look at the cushion top, if all looks good staple along both secured sides; keep the fabric taut.
Repeat the process on the remaining two sides.


Staple the corners. Tuck and fold each corner, try and smooth out the wrinkles as much as possible. Depending on your fabric this can be next to impossible. Outdoor fabric tends to have less give than other home decor fabrics so inevitably there will be some wrinkles showing. Staple the fabric down with as many staples as you need.


Trim and replace underside cover. Trim the excess fabric. Replace the underside cover and secure it with staples.


Reattach the seat to the chair frame. Find the screws that you set aside and secure the seat cushion to the chair frame. Finished.


 I'm happy to report that these seat cushions survived the spaghetti sauce test!


Wednesday, April 18, 2012

Surviving the Grocery Store


I will be the first to admit that I am a grocery store snob. In particular, I have a serious aversion to the Superstore shopping experience.

Where are the olives?

I can never seem to find what I need. Admittedly this is most likely because I rarely shop there so I haven’t gotten used to the set up. But the enormous aisles are a bit ridiculous. I mean really have you ever tried to find pickled olives, anchovies or plum sauce? Good luck!

Panic at the checkout.

I always seem to get stuck in front of some impatient Superstore veteran who sends me evil glares as I frantically untangle my bags while piles of groceries come hurtling down the belt towards me. The evil glares are double if my obvious incompetence at pushing the darn conveyor belt button begins to impede the progress of the cashier. Unfortunately my apologetic looks never seem to quell their clear disgust at my ineptitude.

And these are solo trips, no children in tow because I am smarter than that.

You may be wondering why I bother going to Superstore considering my obvious dislike. Well two reasons.

Joe Fresh clothing for kids.

It is stylish and affordable. And it’s not plastered with pictures of the latest and greatest cartoon characters.

Two words: General Tao.

I can’t get enough of PC General Tao Chicken Chips. If you haven’t tried them you may not want to because they will change your chip eating experience.

So, after several attempts at grocery shopping at Superstore, my trips are now specifically to purchase Joe Fresh clothing when the occasion calls for it, with a quick side trip down the potato chip aisle to grab a couple bags of General Tao’s. And my neighbourhood Sobey’s will be my go to not just for convenience, but for self-preservation.

I love my neighbourhood Sobey’s.

They often give me a hand out to my car without even asking if I need assistance.

This is particularly wonderful, because I’m one of those able-bodied folks that would respond with “No thanks, I can manage,” even as my toddler is throwing all of the credit cards out of my wallet and my baby is mashing gummed up rice crackers into anything that is within reach.

They have shopping carts that fit two children.

Maybe I’m spoiled, but I just can’t fathom how parents with two kids under age 3 manage without a double seated shopping cart. Sure, you could put the older child in the large compartment of the cart, but with a full load of groceries, including produce and bakery products, that is a disaster waiting to happen. Albeit probably better than the inevitable destruction that would surely result from a toddler running rampant down the aisles.


 So, to you parents who must brave the insanity of grocery shopping with little kids, I say best of luck!


Monday, April 16, 2012

Make it Monday: Yarn Ball Mobile


Last week Sophie's room was adorned with a DIY Book Mobile. So this week it was time to make something special for Willow and what could be better than her very own crafty mobile. I came across these yarn globes all over Pinterest generally as wedding decor and light pendants. I was definitely inspired by the photos and thought it would make a great hanging mobile in the nursery.

I don’t like to post a tutorial for a project when there is already a great one out there. In fact there are several tutorials on the web for this particular Make it Monday project (the best one I found was on Wednesday) . However, all of the tutorials I came across require two sets of hands. I tend to work on projects such as this when I have some free time to myself so the luxury of a second set of hands was not available. So this tutorial is for people like me that take on solo crafty projects.


What you'll need:

Balloon(s)
Cotton yarn - I used 12 lengths finger tip to finger tip for each balloon
125 mL White school glue
1/2 cup Corn starch
1/4 cup Warm water
Paint stir stick
Plastic bucket - an empty yogurt or margerine container will do
Paint brush
Masking tape
Broom and 2 chairs - or an alternative way to rig up your work station
Newspaper or drop cloth
Fishing line
Skewer stick or Chopstick
Ceiling hook 
Spray paint (optional) - preferably the "fast-drying" "any angle" spray paint


Directions:


Set up your work station. Suspend the broomstick between two chairs and fasten it with masking tape. Lay newspaper on the floor or table directly below the broomstick. Yes this gets messy.

Hang your balloons. Tie your balloons to the broomstick so they hang above the newspaper. I recommend creating hooks to hang the balloons so they can be easily removed in case you need to add more air after you finish wrapping. I used paper clips as hooks on the end of string to hang my balloons. 


Prepare your glue. Combine the white school glue, corn starch and warm water in your plastic container. Mix well with the paint stir stick until all lumps dissolve.


Set up your yarn and glue dispenser. This is the trick to doing this project on your own without a second set of hands. Carefully coil your yarn into the bottom of the bucket full of glue. From experience it is best to coil it directly into the bucket starting from one end to prevent tangles. Yes it takes a little time, but it's worth it. Tape your paintbrush to the top of the bucket as shown above. Feed the end of the yarn through the paintbrush.

Now the messy part... 


Wrap the balloon. Slowly pull some of the glue soaked yarn through the paintbrush. The brush will clean off the excess glue so you don't end up with a soupy mess (note: this is what the second set of hands would be used for). You can see in the top picture above that I initially taped the yarn to the balloon, you actually don't need to do that, in fact it can be tricky to remove the tape afterwards. Now wrap the entire balloon in the yarn pulling a generous amount through the paintbrush each time. Tuck the end piece in at an intersection of crisscrossed yarn.

Let dry. Drying takes about 24 hours. If you notice that your balloons are starting to shrink before they are dry you can unhook them from the broomstick, carefully untie the knot and blow more air into them until they are once again tightly wrapped. I did this with all three balloons as a precaution after my first trial was an epic failure.

Now they're dry... 


Let the air out. You can pop or deflate the balloon, whatever you prefer. Remove the balloon.

Break out the crystallized glue. You will likely end up with some glue crystals between some of the yarn threads. These can be poked out with a skewer stick or gently brushed out with a stiff bristled paintbrush.

Finish. You can paint if you like. I initially hoped that I could use coloured yarn, but the white glue muted the colours and I didn't like the look so I opted to spray paint them all white. The any-angle spray paint works well for this project. I hung them using paper clips as hooks in order to move them more easily.


Hang. I attached fishing line to a skewer stick that I painted white. I hung the yarn balls at different heights from the skewer stick to achieve this particular look.


Happy Monday!


Bonus: Epic Failure


Well, for those of you who think I made this look too easy. Bahahaha, take a look at my first attempt.


Okay, so now that the tears of laughter are no longer blurring your vision let me tell you what not to do. Or if you like this particular look then maybe this is what you should do.

Don't blow up your balloon too small. Air dissipates quicker if you don't put enough in the balloon. On the other hand if you blow it up too big it's no longer circular, so try and find a happy medium.

Quickly replace air before it dries. If you notice your balloon is starting to lose air before the yarn has dried, carefully untie the knot and blow more air in.

Do this project when you can check on it about every 8 hours or so. Again this is to be sure the air is not dissipating.

Good luck!


Fun fact: The counter top that the "epic failure" ball is sitting on is a closeup of the finished product of my DIY Granite Countertop Paint project.



Monday, April 09, 2012

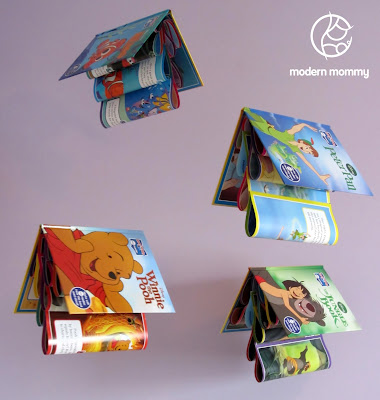
Make it Monday: Book Mobile


I feel as though I must begin this Make it Monday post with a sincere apology on Sophie's behalf to my wonderful friend Amy. Amy thoughtfully gave Sophie an awesome collection of books accompanied by an audio reader for Christmas. Sophie LOVES books, but unfortunately for four of these particular books, she found it more fun to rip pages apart one afternoon during nap time. My attempts to repair them were unsuccessful, sorry Amy.  

I couldn't bring myself to toss the books so I opted to create a book mobile after seeing some similar book art on Etsy, which by the way cost upwards of $40 or $50.


What you'll need:

Hard cover book
Hot glue gun with glue
Fishing line (optional)
Ceiling hook (optional)


Directions: (See pictures above for visual directions)

Tear all of the pages out of the book and separate them individually. Be sure to keep the cover and spine intact.

Line up the the spine edge and outside edge of one page and affix the edges together using a hot glue gun. Do not crease the fold.

Repeat the process with all of the pages of the book. If you are using a particularly thick book you can double up the pages. These kids books only had 8 or so pages each.

Open the book cover and begin by gluing one page into the inside spine of the book, continue with the rest of the looped pages gluing them to the sides of previously affixed pages so they begin to teardrop down. 

Glue the sides of looped pages to the cover to help push the cover out so it stays open.


To hang from the ceiling, simply thread fishing line through the spine, tie a loop adjusted to the length you want and hang from a hook in the ceiling.


Voila!

Happy Monday!


Monday, April 02, 2012

Make It Monday: Chocolate Accents


My Mom recently celebrated a birthday for which Sophie and I decided to make a batch of cupcakes. I didn’t want it to be just an ordinary tray of cupcakes so the wheels in my head were turning, but all I could think of was cupcake cake designs that were more suited to folks still celebrating single digit birthdays. You know, flowers, rainbows, butterflies, barnyard animals, etc.

In my attempt at making them look a bit more grown-up I decided to try my hand at making some chocolate accents to garnish the cupcakes. Here’s a tutorial if you’re facing the same dilemma.

What you'll need:

Chocolate - chips, chunks, chopped up bars, whatever you like really
Saucepan
Glass bowl to fit over the saucepan
A second glass bowl
Piping bag or Sandwich bag
Scissors
Cutting board covered in foil

Step 1: Temper the Chocolate

Tempering your chocolate helps ensure that your chocolate accents end up hardening properly and will have a satisfying "snap" when you break them as opposed to being bendy or floppy. There are several sites and videos that explain how to temper chocolate and they all seem to be slightly different so here's what worked for me.

In a saucepan bring a small amount of water to a simmer and rest a glass bowl over top. Add your chocolate and stir constantly as it melts.

Bring the melted chocolate up to a temperature of 100 degrees Fahrenheit. 

Remove the bowl from the heat, dry the bottom and transfer the melted chocolate to a clean, cool glass bowl.

Stir the chocolate and allow it to cool to a temperature between 88 and 90 degrees Fahrenheit. As you can see in the picture below my thermometer only goes as low as 100 degrees so I had to guesstimate.

There, now your chocolate is tempered. Quickly move on to Step 2 before your chocolate cools too much.


Step 2: Create Chocolate Accents

Fill a piping bag or sandwich bag with your melted chocolate.

Cut the tip. Cut a small amount off first and test the size, you can always cut further up if the hole isn't big enough.

Now for the fun part, get creative and pipe whatever designs you want onto a foil covered cutting board.

Once you're finished, put the cutting board in the fridge to allow the chocolate accents to harden, about an hour or so. 

Gently lift the chocolate accents off of the cutting board and voila, you're finished.


Now you can add them to cakes or cupcakes, or whatever suits your fancy. If you're not going to use them right away simply store them in a resealable container in your fridge until you're ready to use them.


Yum-O!

Happy Monday!